


A few months ago, I needed an internal tool to clean up a workflow that was eating hours out of my week. The honest first instinct was to scope it, brief a developer, and wait. Instead I sat down with Cursor and Claude over a weekend and built it myself. I can’t write production code from scratch. I didn’t have to. The whole thing cost me the price of two subscriptions and a Saturday afternoon.
This isn’t a one-off, and it isn’t a brag — it’s the new baseline. The gap between “I have an idea for an automation” and “it’s running in production” has collapsed. If you’re a founder, ops lead, or anyone running a small team, the question isn’t whether you can build AI workflows yourself, it’s which workflows to build first, and how to stop yourself from drowning in shiny tools that don’t talk to each other.
Here’s how to do it properly.
Start With Your Worst Hour of the Week
Most founders approach AI stacks backwards. They read about a clever agent someone built on X, get excited, and try to retrofit it onto their business. Six weeks later they have a Zapier graveyard and nothing to show for it.
Reverse the process. Open your calendar from last week and find the hour you hated most. The one where you were copy-pasting between tabs, reformatting a spreadsheet, summarising the same kind of email for the fourth time, or chasing down information that lives in five different places.
That’s your first workflow. Not the impressive one. The ugly one.
Why? Because boring, repetitive tasks have three properties that make them ideal for AI: the inputs are predictable, the output quality is easy to judge, and you’ll notice immediately if it breaks. Glamorous workflows (“an AI that does sales calls!”) tend to fail on all three.
A useful rule: if you can describe the task to a new hire in under two minutes, an AI workflow can probably handle 80% of it. If you’d need a week of onboarding, don’t start there. (For a broader look at which categories of work are worth automating first, Futuramo’s guide to AI tools that automate repetitive team work is a good companion read.)
The Four Layers of a No-Code AI Stack
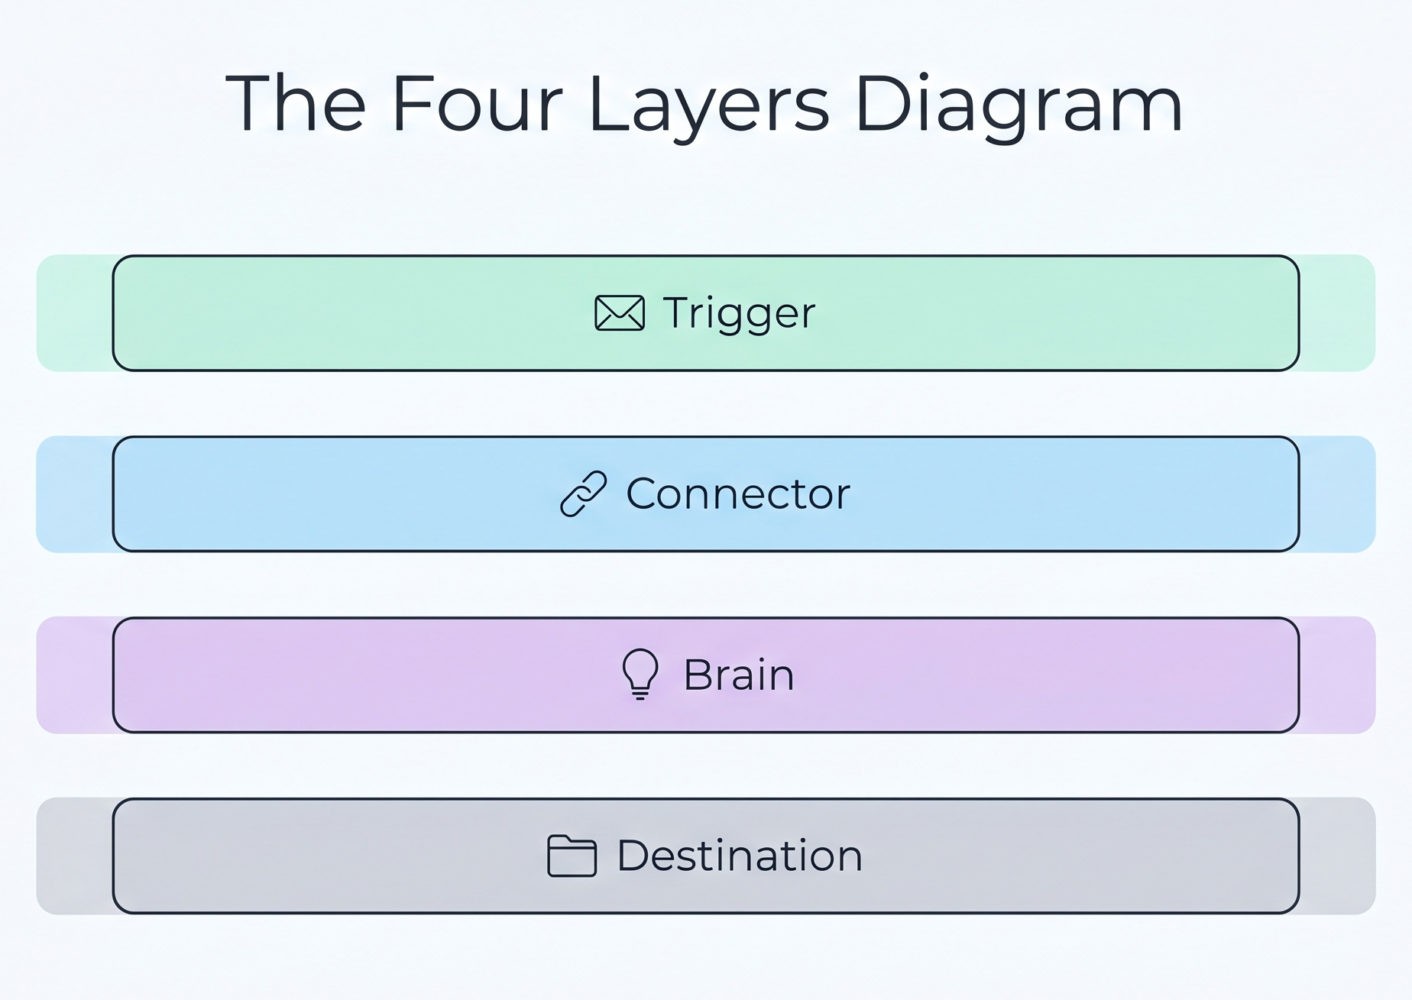
Forget the 200-tool “AI landscape” infographics. Every functional small-team stack has the same four layers. You only need one tool per layer to start.
Layer 1: The trigger. Something has to kick the workflow off. This is usually an email arriving, a form being submitted, a row added to a sheet, a message in Slack, or a calendar event. Tools: Gmail, Typeform, Airtable, Slack, Google Calendar — things you already use.
Layer 2: The connector. This is the plumbing that moves data between your trigger, your AI, and wherever the output needs to land. Three tools dominate here: Zapier (easiest, most integrations, gets expensive at scale), Make (more powerful, steeper learning curve, much cheaper per operation), and n8n (self-hostable, most flexible, requires the most patience). For most founders starting out, Make hits the sweet spot — its Core plan starts at around $9–$12 a month for 10,000 operations, versus Zapier’s $19.99/month for 750 tasks.
Layer 3: The brain. This is where the actual AI work happens. You have two real choices: call a model directly via API (Claude, GPT, Gemini — all accessible inside Make and Zapier without writing code), or use a purpose-built agent platform like Relevance AI, Lindy, or Gumloop that wraps the model in a friendlier interface. Direct API calls are cheaper and more controllable; agent platforms are faster to set up and handle memory and tool use for you.
Layer 4: The destination. Where the output goes. Back into a Google Doc, a Notion page, a Slack channel, a CRM, an email draft. Whatever your team actually checks.
That’s it.
Trigger → connector → brain → destination
Every workflow you build, no matter how complex it eventually becomes, is some version of this four-step shape.
While these tools eliminate the need for traditional syntax and programming languages, it is important to note that they do not eliminate the need for a developer’s brain. Building an effective AI stack requires a ‘logical’ mindset, even if it doesn’t require a ‘coding’ one. To succeed, a team member must be comfortable thinking in terms of structured data mapping and conditional branching, essentially ‘architecting’ the flow of information to ensure the system remains stable as it scales.
Step 1: Map Your Workflow on Paper First
Before you open a single tool, write the workflow out in plain English. Literally on paper, or in a single text document. Something like:
When a customer support email arrives in our shared inbox, read it, classify it as billing / bug / feature request / other, draft a reply in our usual tone, and post the draft plus classification into the #support Slack channel for me to approve.
This sentence is worth more than any tutorial. It forces you to specify three things people skip and regret later: what the trigger is, what decision the AI needs to make, and who has the final say.
If you can’t write your workflow as a single readable sentence, it’s too complicated. Break it into smaller workflows that each do one thing.
Step 2: Pick Your Stack (Concretely)
For a small team starting from zero today, here’s a stack that works for roughly 80% of use cases:
- Trigger source: whatever you already use (Gmail, Slack, Airtable, etc.)
- Connector: Make. It’s about a quarter the price of Zapier at volume, and its visual builder is genuinely clearer once you get past the first hour.
- Brain: Claude or GPT via API, called directly from inside Make. Skip the agent platforms for your first workflow — you’ll learn more by doing it manually, and you’ll understand what those platforms are actually doing for you when you do graduate to one.
- Destination: Slack for things you need to review, Notion or Google Docs for things you need to keep, your CRM for anything customer-facing.
Budget expectation: a small team can run a useful stack for $50–$150 a month. If you’re spending more than that before you have measurable time savings, you’ve over-built.
Step 3: Build the Ugliest Version First
This is where most founders trip. They want the first version to be impressive. Don’t. Build the version that runs end-to-end and produces output a human still has to check.
For the support email example: the first version should read the email, classify it, draft a reply, and put it in Slack with a thumbs-up / thumbs-down button. That’s it. No auto-sending. No fancy routing. No customer database lookups.
Run it for a week. You’ll learn three things you couldn’t have predicted:
- Which edge cases the AI handles badly (and there will be more than you expect)
- Which parts of your prompt need to be tightened
- Whether the workflow is actually saving time, or just moving the work around
Only then should you add complexity.
Step 4: Write Prompts Like You’d Brief a Contractor
The single biggest determinant of whether your stack works is the quality of the prompts you write at the AI step. And the mistake almost everyone makes is treating prompts like search queries instead of briefs.
A good prompt for a workflow has four parts:
- Role: “You are a support lead at a B2B SaaS company that sells project management software to design agencies.”
- Task: “Read the email below. Classify it as one of: billing, bug, feature request, other.”
- Constraints: “Reply in 3–5 sentences. Use a warm, direct tone. Never promise specific timelines. Never apologise more than once.”
- Examples: Two or three real examples of inputs and the kind of output you want. This single addition tends to improve output quality more than any amount of prompt tweaking.
This isn’t folklore. It’s straight out of Anthropic’s prompting best practices, which consistently flag role, clarity, and examples as the highest-leverage moves you can make. Save your prompts somewhere central — a Notion page, a Google Doc, anywhere and treat them as the source code of your AI stack. Because functionally, that’s what they are.
A Real Example: Three Internal Tools, Built Over Long Weekends
Over the last few months I built three small internal tools for myself. None of which existed as off-the-shelf software in the exact shape I needed.
The first was a benchmarking tool. Think of it as a note-taking app, but built specifically for how I gather and compare market data: structured fields where I needed them, free-form notes where I didn’t, and a layout that mirrors how I actually think about competitive research instead of forcing me into someone else’s template. Total build time, including polishing: four days.
The second was a finance tool — a lightweight tracker tailored to how I think about money, not how a generic budgeting app thinks about it. The third was a daily productivity tool: a routine tracker that fits my actual workflow rather than gamifying it into something I’d quit using by week two.
None of these are products. None of them will be. They’re internal tools for an audience of one — which is exactly the point. The reason they work is that they were built for a specific person doing a specific job, not for a market.
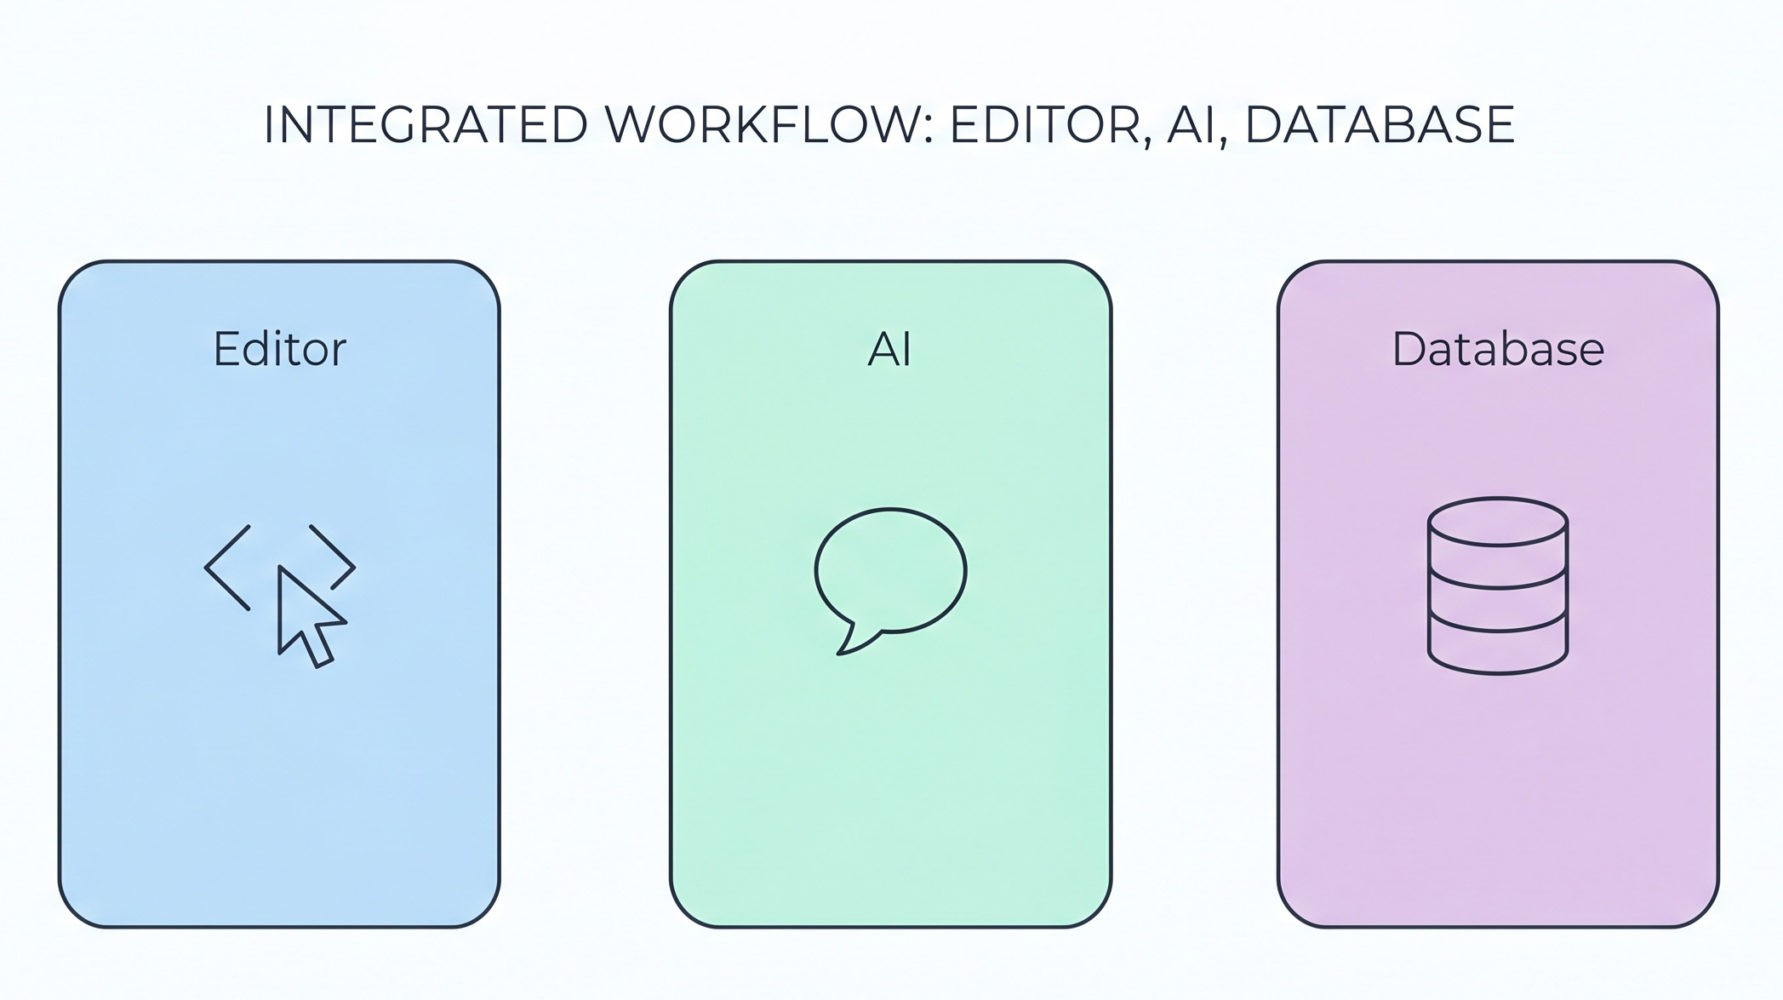
Here’s the stack that made it possible:
- Cursor as the editor — it’s where Claude actually writes the code and where I make the small edits I’m capable of making myself.
- Claude as the brain — for scaffolding the app, writing functions, and explaining what each piece does in plain English when I get stuck.
- Supabase as the database and backend — it handles auth, storage, and the database layer without me needing to spin up a server or write SQL from scratch. For a non-developer, this is the piece that makes the difference between “a toy script” and “an actual tool I use every day.”
The approach was simple: I wrote out what I wanted in plain English first, the same way I described in Step 1 above. Claude scaffolded the structure inside Cursor. Supabase handled the data. I iterated until each tool did what I needed and stopped there.
These aren’t elegant codebases. A real developer would wince. But they run, they do exactly what I want, and they cost almost nothing to maintain.
The interesting part isn’t the time saved — though that’s real. It’s that I ended up with tools shaped to my actual workflow rather than retrofitting my workflow to whatever the closest SaaS product happened to support. Twenty years in SaaS taught me how rare that is.
If you’d told me three years ago that I’d build three internal tools in a handful of long weekends without writing production code, I’d have laughed. That’s the shift worth paying attention to.
Most AI Workflows Fail Because They Replace the Wrong People
Here’s the part nobody selling you AI tools will tell you. The reason most small-team AI projects quietly die isn’t because the technology doesn’t work. It’s because founders try to automate the work their best people do, instead of the work their best people don’t want to do.
Your senior support lead handling tricky enterprise complaints? Don’t automate that. The output is high-leverage, the context is deep, and the AI will produce something plausible-but-wrong that erodes trust.
The pile of tier-1 password reset emails your senior support lead resents getting pulled into? Automate that yesterday. The same person will be twice as effective at their actual job.
Apply this filter to every workflow on your list. If the answer to “would I trust a smart but green new hire to do this on day one?” is yes, you have a candidate. If the answer is no, leave it alone for now. (This is also one of the reasons project managers, in particular, get strong ROI from these stacks — see Futuramo’s breakdown of why project managers should consider AI for their tasks.)
Step 5: Build a Review Loop Before You Build a Second Workflow
This is the rule founders break most often. They get one workflow running, feel a hit of dopamine, and start building three more before the first one has proven itself.
Don’t. Before you build workflow number two, set up two things:
- A weekly check-in (15 minutes is plenty) where you look at what your workflows produced and flag what was wrong, weird, or off-tone. This is your QA loop. Track four things, lightly: output quality (good / acceptable / off), time saved versus the manual version, error rate (how often a human had to rewrite the AI’s output), and team satisfaction (does anyone still hate using it?). Four numbers, one minute each. Don’t overbuild this — a shared Google Sheet is plenty.
- A kill switch. A way to pause any workflow in one click. In Make and Zapier this is built in; just make sure you know where the button is and that anyone on your team can hit it.
Workflows that nobody reviews drift. The AI’s output quality on a workflow you built three months ago and haven’t looked at since is almost certainly worse than you think, because your prompts haven’t kept up with how your business has changed.
Step 6: Make It a Team Capability, Not a You Capability
The fastest way to kill a working AI workflow is to be the only person who understands it. The moment you go on holiday, get pulled into a fundraise, or just have a busy week, an unattended workflow drifts, and nobody on your team knows where to look.
Three small habits prevent this:
- Write a one-page README for every workflow. What it does, what triggers it, where the prompt lives, who to ping if it breaks. Treat this like onboarding documentation for a new hire, because that’s effectively what it is.
- Pair on the next one. When you build workflow number two, build it alongside one other person on the team. They don’t need to be technical. They need to be able to pause it, read the output, and tweak the prompt when something drifts.
- Rotate the weekly review. Whoever sits in the 15-minute QA seat each week catches different things. Marketing notices tone issues. Ops notices missed edge cases. Sales notices weird customer phrasing. Rotate it.
A workflow that only you can maintain is a single point of failure dressed up as productivity. For small and hybrid teams in particular, building shared ownership into your tools from day one is the difference between ”Jenn’s automation” and ”the way we do client reporting now.” (Futuramo’s piece on mastering hybrid work and team collaboration goes deeper on the protocols and shared-ownership habits that make this stick.)

What You Can Do Today
If you finish reading this and want to actually do something, here’s the minimum-viable next hour:
- Open last week’s calendar and pick the worst hour. Write the workflow as one sentence.
- Sign up for Make (free tier is enough to start). Connect it to whatever app the trigger lives in.
- Add an API call to Claude or GPT as the second step. Paste your prompt, including two examples.
- Send the output to Slack or a Google Doc for review.
- Run it manually three times with real inputs. Fix what’s wrong.
You don’t need to know what an API key is in the abstract — both platforms walk you through generating one in about two minutes. You don’t need to write code. You need to be willing to iterate on a prompt the way you’d iterate on a job description for a new hire.
The Takeaway
The democratisation of AI workflows isn’t coming. It’s here, and the founders who’ll benefit most aren’t the ones building the most sophisticated stacks. They’re the ones who pick one ugly, high-frequency task, automate it end-to-end this month, and then resist the urge to build twelve more until that first one has earned its keep.
Your competitive advantage isn’t access to the tools. Everyone has access to the tools. It’s the discipline to start small, review honestly, and only scale what’s working.
Pick your worst hour. Build the ugliest version. Ship it by Sunday.
About the author:
Jenn White has spent 20 years inside SaaS companies, working across sales, marketing, and product development. She writes about AI, productivity, and the tools small teams actually use — drawing on two decades of watching what works in real businesses versus what just sounds good in a pitch deck. Her work covers AI, marketing, digital culture, and the evolving shape of modern work.